Tuesday, August 18, 2015

Jeep 3rd Brake Light Install


During my aftermarket rear bumper install, I realized I needed a third brake light. Check Your state's 3rd brake light law. 


Maryland law states -- 
"Section 22-206(a)(1): Every motor vehicle registered in this State and sold as a new vehicle after June 1, 1967, shall be equipped with at least two stop lamps."   

I went with the Barricade Adjustable Brake Light Bracket with LED Light 👉 Read More  


Install Steps

This install was pretty simple once I figured out the wiring. First, I needed the factory wiring harness, which I had all ready removed from the old brake light.


With an Allen Wrench, I removed the LED light adjustable bracket from the mount. 


Then bolted it to the pre-drilled holes for the factory spare tire mount. 


Now it was time to wire up the LED light to the factory wiring harness.  I needed to cut the factory brake light wires at the plug and connect those wires to the LED wires. However, I was a little puzzled. The LED has three wires and the harness has too. 


The directions stated -- Connect the black factory wire to the white LED light wire and the white/orange factory wire to the red LED light wire. There was still the third black wire. I didn't know what to do with this wire. I was told to just secure it with heat shrink and leave it so that is what I did.


I'm told by a fellow Jeeper that this is a standard STT trailer light used with this application. That is because they are inexpensive, readily available, and mount easily with the grommet. These lights have a circuit for running lights and turn signal/stop. Hence the name STT - Stop Turn Tail.


You can attach these wires with butt connectors.  I decided to solder, heat shrink, and liquid tape them together. Just like I learned when I wired up my Raxion LED lights. 👉 Read More 

Once all the wires were connected, I inserted the LED 3rd brake light into the adjustable bracket with a firm push. Then attach the brake light bracket to the mount attached to the tailgate.


I had to get creative with the wires by running the wiring harness down the bracket to the hole in the tailgate. Then plugged the wires back into the brake lights. 


Friday, August 14, 2015

Jeep Rear Bumper Install

Barricade Trailforce HD Rear Bumper 

One of my first modifications to my Jeep was the Barricade Trailforce HD front bumper. I went with this bumper for three reasons: cost, ease of install and tow points. Once I installed the bumper, Extreme Terrain took notice and sent me the rear matching bumper in exchange for blog post on the installation.  

Front Bumper Install 👉 Read More

Barricade Rear Bumper for the Jeep Wrangler 👉 Buy Here


The rear bumper arrived quickly from my favorite delivery guy in the Big Brown Truck.  


The rear bumper came in a big, sturdy box, and was well wrapped with all the parts. The tire carrier arrived in another box, and again it was well wrapped. This bumper weighs 110 lbs, and the tire carrier weighs 49 pounds. 

I was concerned about the rear end of the Jeep sagging and losing clearance, so I decided to measure from my muffler and the rear axle. The good news is, once I installed all the parts, and put the spare tire back on, it did not drop anything from my measurements.


Factory Bumper Removal

Step 1

The first thing I did was remove the spare tire and set it aside. 


Step 2

Then I disassembled the factory spare tire mount from the tailgate. It was very simple. All I needed was a 13 mm socket, and it came right off. The bolts were not on too tight where I couldn't get them off. 


Step 3

On the inside of the tailgate is a black plastic panel where the wiring harness is housed for the brake lights. I unplugged the 3rd brake light wires from the brake lights. 

Aftermarket Third Brake Light Install 👉 Read More


Step 4 

Next was the removal of the factory rear bumper. It was pretty easy. First, I removed the four 15 mm bolts, two on each side. There are also two more bolts on the frame near the muffler as well.   


Step 5

Now it was time to pull off the factory rear bumper. This was a little tricky. You needed to maneuver the bumper so you could slide it out from the fenders. But it wasn't too difficult. 


Step 6

The last step I needed to complete before I was able to install my new Barricade Trailforce HD Bumper with Tire Carrier was to remove the factory tow hitch. I thought this would be pretty simple. But it wasn't. The rear bumper bolts weren't that tight, so I figured these would be pretty easy. But these bolts are very difficult to get off. So I had to get help with these bolts. 


Once the factory bumper was removed, it was a pretty simple process to install the my new rear bumper. 


Barricade Rear Bumper Install

Step 1

First, I attached the mounting bracket to the inner side of the rear bumper support beam. These bolts are about 5 inches long. It was a tight space in between the muffler and the support beam. By pushing slightly up on the cover over the muffler, the bolts will slide in.   


Step 2

Then I slid the L-Shaped mounting brackets into the frame rails with the nut backing up to the pre-drilled holes in the frame. All the parts fit to the existing holes all ready on the frame. There was no drilling necessary. 


Step 3

Now it was time to slide my new rear bumper over the brackets and bolts I set into place. However, it was all hands on deck for this one. This is something that needed two people. The rear bumper weighs 110 pounds. I called in help to lift the rear bumper, as I guided it into the bolts that were attached to the support beam. It took some adjustments, but we eventually got it into place. Unfortunately -- there are no pictures of this step as my photographer had gone off to play with his friends -- my nine year old son.


Step 4 

Once the bumper was on it was time to thread the supplied bolts to the side bumper support and tighten.


Step 5

Then I crawled under the Jeep and threaded the nuts onto the bolts and began to tighten all four bolts. 


Step 6

Now that the rear bumper was installed and secure, it was time to get the tire carrier gate installed. First make sure you pull the plastic off the post. It is also good idea to add some grease to the post for a smoother operation. To secure the gate on the post I added the cap and secured it with the allen-head bolt. 

Step 7

Next up was the tire carrier gate latch. I slide the latch into the end of the swing arm and secured it with the two supplied bolts and nuts. 


Step 8

Finally, the last step -- install the rear tire carrier by securing it to the rear swing arm. Then adjust it to the desired height. 


All I had to do was loosen the bolts and slide the piece out and the tire now sits at the right height. I'm thinking I might need to get those shackles painted purple now.


 ExtremeTerrain provided the rear bumper with tire carrier for review. No additional compensation received.  All opinions are my own. 


Jeep Momma is a participant in the Amazon Services LLC Associates Program, an affiliate advertising program designed to provide a means for sites to earn advertising fees by advertising and linking to Amazon’s website. As an Amazon Associate, I earn from qualifying purchases.

Monday, August 10, 2015

50 Before 50 List

Getting Started

(Updated December 2023) We all struggle with growing older. Every passing moment is a precious gift. It can slip through our fingers in a blink of an eye. In my own journey of self-discovery, I decided to start living my life to the fullest.
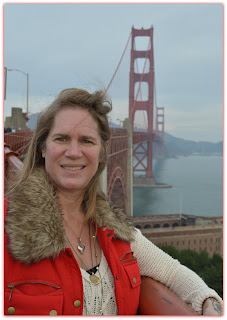
However, as I get closer to the big Five-Oh I am starting to freak out a little. 

My Solution 


Crafting a "50 before 50" list. This journey to find pleasure in the simple things. A chance to try new things. Simple every day pleasures. Things most everyone has done, but me. 

Scroll to the end of this post for my complete list


My Story 

I decided embarked on an fun journey to savor life's moments, and it all began with a simple list.

Try a Slurpee for the First Time 

The first item I checked off surprised my son. He asked, "What is on the list?" So, I named a few things off. When I said I've never had a Slurpee from 7-11 his jaw dropped. He said we need to do that right now. My boys teach me the proper Slurpee process. 

It was a great moment seeing them teach me something so simple. I was a little hesitant to pull the knob, and my son laughed at me. When it was time to test out the Slurple my son was very anxious for my response. The texture was different then I expected, but it was just too sweet for me. 


Bake a Cake from Scratch


My 49th birthday some of my friends got together to surprise me. They had all the ingredients ready for baking a cake from scratch, something I had never done. With a little guidance from them I did some measuring, whisking, pouring, chopping and mixing. 


The cake was a chocolate cake with a cup of coffee, chopped chocolate, cocoa and mayonnaise in it.  
I also mixed up the chocolate icing from scratch.  Then iced my own birthday cake. This was my first time making a cake from scratch. Pretty good for my first home-made cake, moist and tasty.


My First Power Tool 


It was suggested I get an impact wrench to help me install my aftermarket Jeep bumper. I returned the power tool the next day. When I his the trigger it overwhelmed me. I ended up getting a Black and Decker drill with less power. I thought it best I start out small and work my way up. 

Try a New Veggie


Like most all kids I hated my veggies growing up. As an adult I have a greater appreciation for them. I decided I would try a new vegetable I have never tried. I picked Eggplant. I made eggplant Parmesan. 
Check out this recipe and my other clean eating recipes here. 


Bake Bread From Scratch 


It was quite fun AND... it was a huge success with my family. Especially my 16 year old. He raved of my bread for days! 


Girls Getaway & Buy an Every day Dress


When my dad's sister died recently, I began to realize how short life can be. My aunt and her daughters would take little getaway trips. I found my sisters, mom and I hadn't done that. Knowing how quickly things can change we all got together for our first weekend getaway. We headed up the North Shore of Lake Superior for a little shopping and taking in the sites of the beautiful fall landscape. 


I donated a pint of blood to the National Children's Hospital. My blood will in turn help three to four kids with cancer.


Getting a tattoo is very cathartic for me. The pain, which is bearable, is like a release of negative emotions.  This 4th tattoo is of gladiolus, my birth flower, and three butterflies. The three butterflies signify three moments in time that altered my most recent life's path. One small moment in time can change the direction of your life. For me it is about embracing the little moments. 


Visit Wells, Maine a town my ancestors settled


Go Dancing


It was a night of good old fashion dance at  Cafe Saint-Ex.  The last time I hit a dance floor was -- well...let's just say it was way before my mom days began. The DJ began spinning tunes they called "Oldies" -- songs I grew up listening too.  

We finally had enough of a work out on the dance floor and headed back upstairs to sit back and relax for one more cocktail. A very surreal moment as I sat and watched all the patrons drinking and chatting realizing how much time has gone by and that life is too short to sit around and wait for it to happen.

Jeep Momma's Simple 50 before 50 list 

 I began this list the year before I turned 50. Through out the year I changed it as I made new goals. other 

1.  Write a book and send it to publishers - I completed this 5 years after I was 50
2.   Try  Sushi
3.   Bake a cake from scratch 
4.   Get another tattoo
5.   Donate a pint of blood 
6.   Go to Karaoke Night
7.   Visit Wells, Maine -- the town my ancestors settled
8.   Buy shares in a company Earn Trail #11 at Rausch Creek
9.   Go on a haunted Ghost Tour
10. Eat a new vegetable
11. Watch The Godfather trilogy  Drink a Bloody Mary
12. Watch Gone with the Wind
13. Ride a scenic Train in West Virginia  Crawler Ridge Trail at Rausch Creek badge
14. Get a Facial 
15. Go Dancing
16. Do a good deed... Pay it forward
17. Meet an online friend in person
18. Add purple highlights to my hair
19. Make a loaf of bread from scratch
20. Pay for a stranger's lunch
21. Buy my first power tool for myself
22. Try a Float Spa  Wheel Anthracite Outdoor Adventure Area
23. Girl's Overnight trip
24. Go 24 hours without technology
25. Buy a lottery ticket 
26. Remove the carpet in the living room   Start Running again
27. Tape some change to a parking meter
28. Visit the National Gallery of Art  See ACDC in Concert but they cancelled the DC concert
29. Eat at Good Stuff Eatery 
30. Finish a novel required in high school I didn't finish
31. Grow an indoor Herb Garden
32. Buy a coffee table for our living room   Smoke a Cigar
33. Cook something with Truffle oil
34. Wear my hair in a braid
35. Drink a glass of Brandy
36. Get a bikini wax   Play a game of pool at a bar (just like I did in my 20's)
37. Take a Yoga class at my gym
38. Take a pole dancing class  Drink a Margarita 
39. Get a Slurpee from 7-11
40. Try a Moon Pie
41. See the Cherry Blossom's in bloom in DC
42. Start a fire without matches    Swim (for me wade) in a Great Lake (Lake Erie)
43. Learn how to tie a man's tie
44. Name a star after myself   Drink a Martini
45. Take a 10 mile bike ride   Try a white wine spritzer
46.  Lose 10 pounds
47.  Buy a dress to wear as an everyday dress 
48.  Watch a TED talk on you tube
49.  Send a random gift to a random friend
50. Make a no bean chili

It's a Jeep Thing

More Than Just a Phrase In the automotive culture, certain phrases and slogans become emblematic of an entire community. Among them, "I...